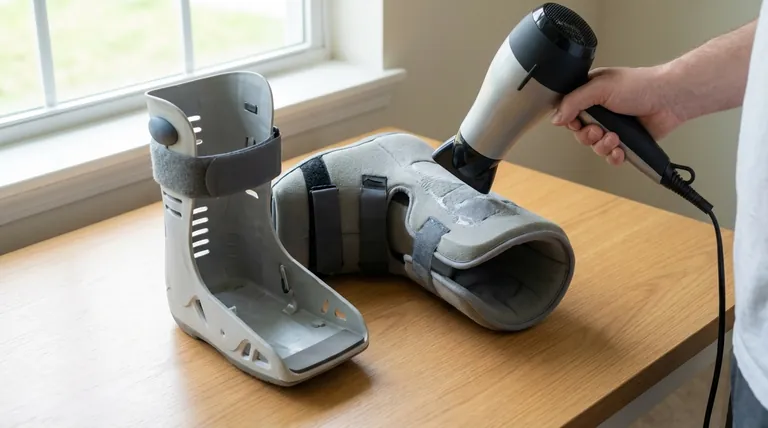
If your walking boot gets slightly wet, the immediate goal is to dry it thoroughly and safely. You can accomplish this by removing the soft liner, if possible, and using a hair dryer set to its cool air setting. This prevents damage to the boot's materials while ensuring the moisture that can harm your skin is removed.
The primary concern with a wet walking boot is not damage to the boot itself, but the risk of skin irritation and infection. Prompt and correct drying is a critical part of maintaining skin health during your recovery.
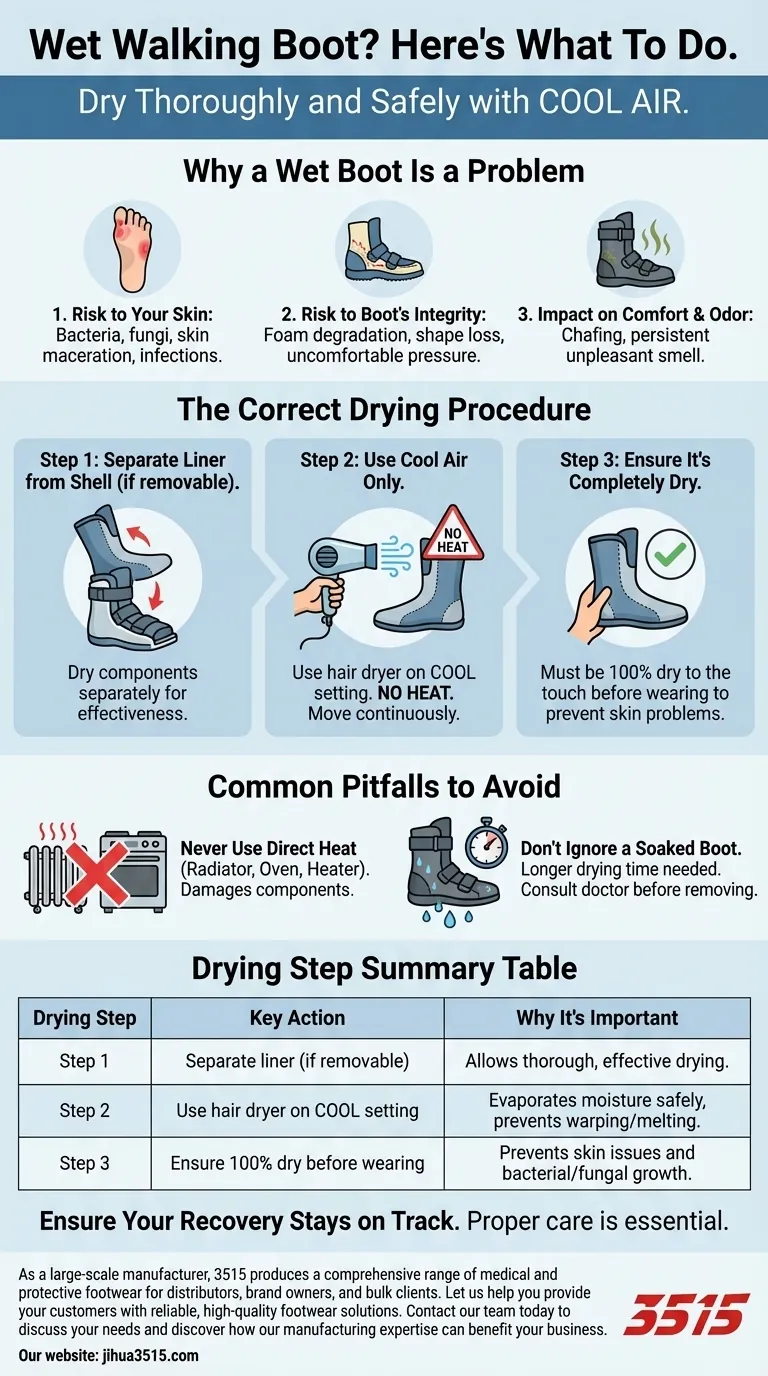
Why a Wet Boot Is a Problem
A walking boot, or CAM (Controlled Ankle Motion) boot, is a prescribed medical device. Keeping it in proper condition is essential for a safe and effective healing process. Moisture introduces several risks.
The Risk to Your Skin
The warm, dark, and damp environment inside a wet boot liner is a perfect breeding ground for bacteria and fungi. This can lead to skin maceration (softening and breakdown), rashes, blisters, or infections, which can severely complicate your recovery.
The Risk to the Boot's Integrity
While the outer shell is durable plastic, the inner liner is typically made of foam and soft fabrics. Persistent moisture can degrade these materials, causing them to compress or lose their shape. This can reduce the boot's effectiveness and create uncomfortable pressure points.
The Impact on Comfort and Odor
A damp liner is uncomfortable against the skin and can lead to chafing. It will also quickly develop a persistent, unpleasant odor as microorganisms multiply.
The Correct Drying Procedure
Follow these steps to dry your boot without causing damage. Never use high heat, as it can warp the plastic shell or melt the foam liner.
Step 1: Separate the Liner from the Shell
If your boot has a removable liner, carefully take it out. This allows you to dry the liner and the inside of the plastic shell separately and much more effectively.
Step 2: Use Cool Air Only
Set a hair dryer to its cool or no-heat setting. Hold it several inches away from the liner and shell, moving it continuously to circulate air over all damp areas. This gently evaporates the moisture without risk of damage.
Step 3: Ensure It's Completely Dry
Do not put the liner back in or wear the boot until all components are 100% dry to the touch. Even slight dampness is enough to cause skin problems.
Common Pitfalls to Avoid
Proper care is as important as wearing the boot correctly. Avoid these common mistakes that can jeopardize your safety and recovery.
Never Use a Direct Heat Source
Do not place your boot or its liner on a radiator, in front of a space heater, or in an oven. The intense heat can permanently damage the boot's structural components, rendering it unsafe.
Don't Ignore a Soaked Boot
If your boot becomes completely soaked rather than just slightly damp, it will require a much longer drying time. Ensure it is fully dry before wearing it again, and inspect your skin for any signs of irritation.
Don't Discontinue Use Without Approval
While you may need to remove the boot for drying, this should only be for a short period. The references are clear: never stop using your boot altogether without explicit instructions from your doctor, as this can lead to re-injury. If you are unsure whether it's safe to remove it, consult your healthcare provider first.
Making the Right Choice for Your Recovery
Properly managing your walking boot is an active part of your healing. The goal is to keep it clean, dry, and functional so it can do its job effectively.
- If your boot gets slightly wet from rain: Your immediate action is to remove the liner and use a hair dryer on the cool setting to dry all parts completely.
- If your primary focus is preventing complications: Always prioritize your skin's health by never re-wearing a boot that is even slightly damp.
- If you are ever unsure about care or removal: Your safest course of action is to contact your doctor or physical therapist for guidance.
Ultimately, treating your medical equipment with care is a direct investment in your own successful recovery.
Summary Table:
| Drying Step | Key Action | Why It's Important |
|---|---|---|
| Step 1 | Separate the liner from the shell (if removable). | Allows for thorough, effective drying of all components. |
| Step 2 | Use a hair dryer on the cool air setting only. | Evaporates moisture safely without warping or melting materials. |
| Step 3 | Ensure the boot is 100% dry before wearing. | Prevents skin maceration, rashes, and bacterial/fungal growth. |
Ensure Your Recovery Stays on Track
A wet walking boot is more than an inconvenience—it's a risk to your skin health and recovery. Proper care is essential.
As a large-scale manufacturer, 3515 produces a comprehensive range of medical and protective footwear for distributors, brand owners, and bulk clients. Our production capabilities ensure that every product, from walking boots to specialized safety shoes, is built with durability and user safety in mind.
Let us help you provide your customers with reliable, high-quality footwear solutions. Contact our team today to discuss your needs and discover how our manufacturing expertise can benefit your business.
Visual Guide
Related Products
- Wholesale Durable Camouflage Canvas Shoes with High-Traction Cleated Rubber Sole
- Durable Rubber Sole Outdoor Shoes Wholesale & Custom Manufacturing
- Durable Goodyear Welt Leather Work Boots for Wholesale & Private Label
- Wholesale High-Traction Camo Boots - Custom Manufacturer for Brands
- Heavy-Duty Waterproof Nubuck Safety Boots Safety Shoes for Bulk Supply
People Also Ask
- Why should you try on shoes with the socks you plan to wear regularly? Ensure a Perfect, Pain-Free Fit
- What are some alternative shoe options that work well with jeans? Elevate Your Style Beyond Sneakers
- What are some examples of vulcanized shoes? Discover the Flexibility and Board Feel of Classic Sneakers
- Why is the selection of high-strength fabric materials necessary in the production of canvas shoes and training shoes?
- Can canvas shoes be worn in rainy conditions? The Truth About Water Resistance