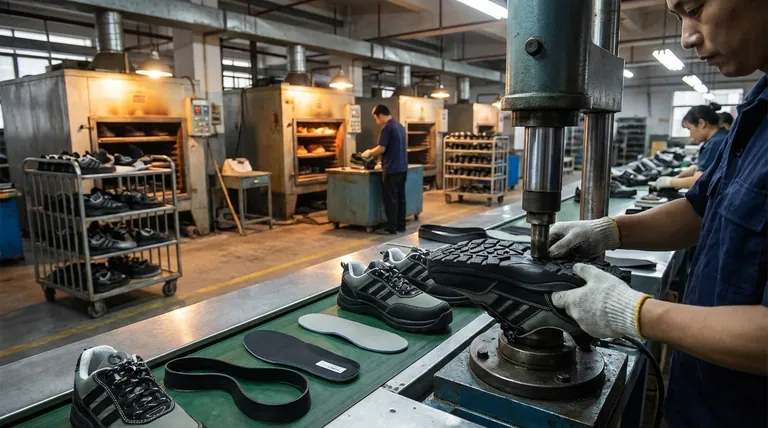
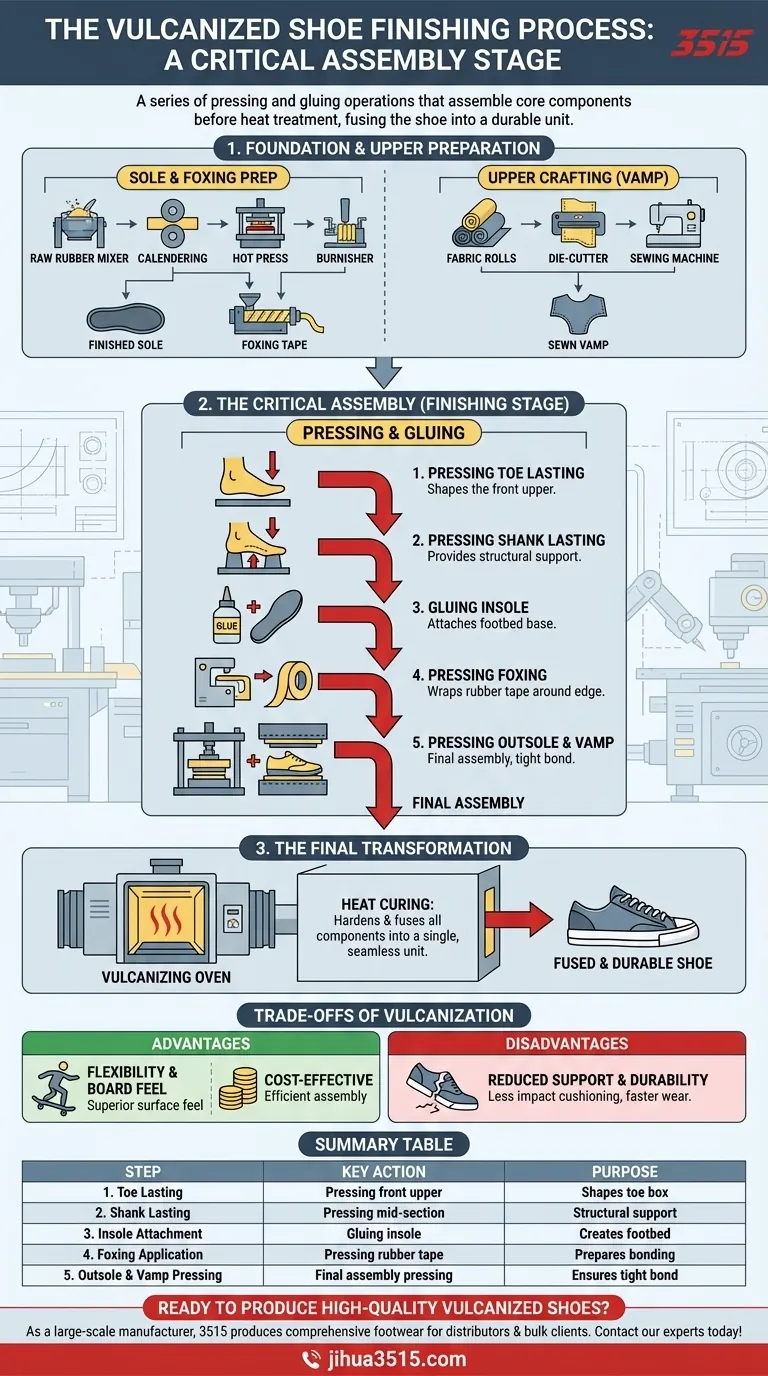
In the manufacturing of vulcanized shoes, the finishing process is a series of pressing and gluing operations that assemble the shoe's core components. It involves pressing the toe and shank lasting into shape, gluing the insole, and then precisely pressing the rubber foxing tape, outsole, and fabric vamp together before the final heat treatment.
Shoe finishing is not merely the final touch; it is the critical assembly stage where the upper, insole, and raw rubber components are joined. This preparation is what allows the subsequent heat-curing process—vulcanization—to fuse the entire shoe into a single, durable, and flexible unit.
Deconstructing the Vulcanized Shoe Process
To fully grasp the finishing stage, it's essential to see it as a key step in a larger sequence. The process begins with creating the individual parts and culminates in fusing them into a whole.
The Foundation: Sole and Foxing Preparation
Before assembly can begin, the rubber components must be manufactured.
The sole is created by mixing raw rubber, calendering it into sheets, hot-pressing it into its final shape, and then burnishing the edges for a clean look. The foxing—the rubber tape that wraps around the edge of the shoe—is made separately through a process called extrusion.
Crafting the Upper: The Vamp
The vamp, or the main body of the shoe's upper, is constructed in parallel.
This involves gluing and die-cutting fabric pieces, which are then sewn together according to the specific design of the shoe.
The Critical Assembly: The Finishing Stage
This is where the shoe takes its recognizable form. The steps are methodical and focus on precise alignment.
- Pressing the Toe Lasting: The front of the shoe's upper is shaped and pressed.
- Pressing the Shank Lasting: The mid-section of the shoe is pressed to give it structure.
- Gluing the Insole: The insole is glued into the bottom of the assembled upper.
- Pressing the Foxing: The extruded rubber foxing tape is wrapped around and pressed onto the shoe.
- Pressing the Outsole and Vamp: The rubber outsole is attached to the bottom, and the entire assembly is pressed together to ensure a tight bond before it moves to the oven.
The Final Transformation: Vulcanization
After the "finishing" or assembly is complete, the entire shoe is heated in a vulcanizing oven. This process cures the rubber, causing it to harden and permanently fuse to the fabric upper and other rubber components, creating a seamless and chemically bonded shoe.
Understanding the Trade-offs of Vulcanization
The finishing and vulcanization process directly results in the shoe's distinct characteristics, which come with a clear set of advantages and disadvantages.
Advantage: Flexibility and Board Feel
The single-piece, fused construction is highly flexible. This gives the wearer, particularly skateboarders, a superior feel for the surface beneath their feet.
Advantage: Cost-Effective Construction
The streamlined assembly and pressing steps are efficient, making vulcanized shoes generally less expensive to produce than more complex constructions like cupsoles.
Disadvantage: Reduced Support and Durability
The simple, thin construction offers less foot support and impact cushioning. Because the sole is a single, softer piece of rubber, it also tends to wear out faster than other, more robust sole types.
Making the Right Choice for Your Goal
The finishing process is not just a series of steps; it defines the final product's performance and purpose.
- If your primary focus is performance and board feel: The finishing process's precise alignment of the foxing and outsole is critical for ensuring the shoe's signature flexibility.
- If your primary focus is durability and support: Recognize that the inherent design of vulcanized shoes, assembled during finishing, offers less structural support than more complex alternatives.
- If your primary focus is cost-effective manufacturing: The streamlined assembly and pressing steps in the finishing stage are a key contributor to the overall efficiency of vulcanized shoe production.
Ultimately, understanding the finishing process is key to appreciating how a vulcanized shoe achieves its unique balance of form, function, and feel.
Summary Table:
| Step | Key Action | Purpose |
|---|---|---|
| 1. Toe Lasting | Pressing the front upper | Shapes the shoe's toe box |
| 2. Shank Lasting | Pressing the mid-section | Provides structural support |
| 3. Insole Attachment | Gluing the insole | Creates the footbed base |
| 4. Foxing Application | Pressing rubber tape around the edge | Prepares for vulcanization bonding |
| 5. Outsole & Vamp Pressing | Final assembly pressing | Ensures a tight bond before curing |
Ready to produce high-quality vulcanized shoes? As a large-scale manufacturer, 3515 produces a comprehensive range of footwear for distributors, brand owners, and bulk clients. Our production capabilities encompass all types of shoes and boots, ensuring your products are durable, flexible, and cost-effective. Let's discuss your project – contact our experts today to get started!
Visual Guide
Related Products
- Durable Rubber-Soled Utility Shoes for Wholesale & Custom Brand Manufacturing
- Durable Rubber Sole Outdoor Shoes Wholesale & Custom Manufacturing
- Wholesale Durable Camo Canvas Shoes with High-Traction Rubber Soles
People Also Ask
- What are the types of rubber sole shoes available? Choose the Right Sole for Durability & Comfort
- What are the advantages of rubber-soled shoes? Unlock Superior Grip & All-Day Comfort
- What makes rubber sole shoes an economical and practical choice? Unmatched Durability & All-Weather Value
- When were rubber sole shoes invented? From 1800s Concept to Modern Mainstay
- Why are rubber-soled shoes considered multi-weather footwear? Unlock All-Season Traction & Protection


