Applying wax for waterproofing is a straightforward process that involves thoroughly cleaning the item, applying the wax with special attention to seams, using gentle heat to ensure it absorbs into the material, and allowing it to cure completely before buffing off any excess. This method creates a durable, water-repellent barrier.
The core principle is not simply coating the surface, but using gentle heat to help the wax penetrate the material's pores. This creates an integrated and far more effective water barrier than a simple surface-level application.
The 4-Step Waterproofing Process
Achieving a durable, waterproof finish requires a methodical approach. Each step builds upon the last to ensure the wax fully integrates with the material for maximum protection.
Step 1: Start with a Clean, Dry Surface
You cannot waterproof dirt. Before you begin, thoroughly clean your footwear or gear to remove all mud, dust, and grime.
Allow the item to air dry completely, away from direct heat sources like radiators or fires, which can damage materials like leather. Applying wax to a damp surface will trap moisture and prevent proper absorption.
Step 2: Apply the Wax Thoroughly
Using a clean cloth or even your fingers, apply the wax in a circular motion across the entire surface. Some waxes may need to be warmed slightly to become more pliable.
Pay special attention to seams, stitching, and creases. These are the most common points where water is likely to penetrate, so ensure they receive a generous application.
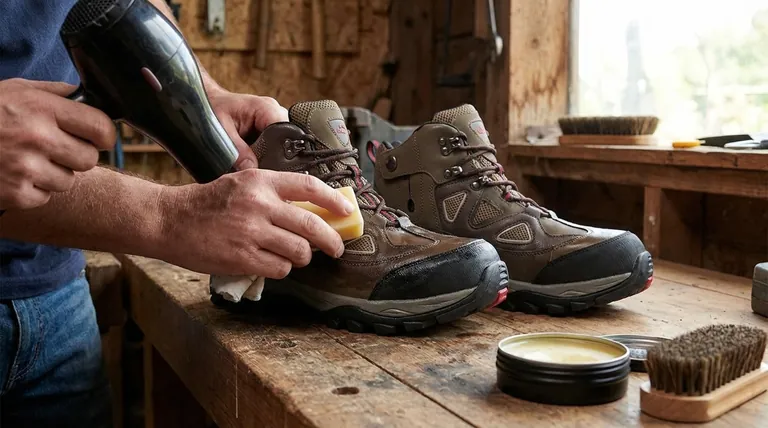
Step 3: Use Gentle Heat for Proper Absorption
This is the most critical step for a lasting finish. Gentle heat melts the wax, allowing it to soak deep into the material's pores rather than just sitting on top.
Use a hairdryer on a low setting, holding it several inches away from the surface. As you apply heat, you will see the wax "melt" and disappear into the material. This indicates successful absorption. Distribute the heat evenly to avoid overheating any single spot.
Step 4: Cure, Buff, and Test
Once the entire surface has absorbed the wax, let the item sit and air dry for several hours, or as recommended by the product manufacturer.
After it has fully cooled and cured, take a clean, dry cloth and buff off any excess wax. This will remove any sticky residue and can produce a slight sheen.
To confirm your work, sprinkle a few drops of water on the surface. If the water beads up and rolls off, the waterproofing is successful.
Common Pitfalls and Considerations
While effective, wax waterproofing is not a universal solution. Understanding its limitations is key to getting the result you expect.
Wax Can Alter Appearance
Applying wax, especially with heat, will almost always darken the color of leather. It can also change the texture, often making a matte finish appear more smooth or semi-glossy. Always test on a small, inconspicuous area first if the final appearance is a major concern.
Impact on Breathability
Traditional wax products work by filling the microscopic pores in a material to block water. This process inherently reduces breathability. For footwear with modern waterproof membranes (like Gore-Tex), be sure to use a product specifically formulated not to clog the membrane's pores.
Maintenance is Required
Wax waterproofing is not a permanent treatment. The protective layer will wear down over time, especially in high-flex areas like the toe box. For regularly used items, plan to reapply the wax every few months or as needed to maintain protection.
Making the Right Choice for Your Goal
Tailor your application technique based on the item and your primary objective.
- If your primary focus is maximum weather protection for work or hiking boots: Use the hairdryer method thoroughly and consider applying a second thin coat after the first has cured.
- If your primary focus is water resistance for casual leather shoes: Use a lighter application, test on a hidden spot to check for color change, and focus your efforts primarily on the seams.
- If your primary focus is simple, regular maintenance: A quick re-application to high-wear areas like creases and seams is often sufficient to keep your gear protected.
Ultimately, proper wax application empowers you to restore and enhance the protective qualities of your gear.
Summary Table:
| Step | Key Action | Purpose |
|---|---|---|
| 1 | Clean & Dry Surface | Removes dirt/grime for proper wax absorption |
| 2 | Apply Wax Thoroughly | Covers entire surface, especially seams and creases |
| 3 | Use Gentle Heat | Melts wax for deep penetration into material pores |
| 4 | Cure & Buff | Removes excess wax and creates a durable barrier |
Need durable, waterproof footwear for your customers?
As a large-scale manufacturer, 3515 produces a comprehensive range of waterproof boots and shoes for distributors, brand owners, and bulk clients. Our production capabilities ensure high-quality, pre-treated footwear that saves you time and delivers superior performance to your market.
Contact us today to discuss your manufacturing needs and elevate your product line!
Visual Guide

Related Products
People Also Ask
- What makes durable safety boots? The Ultimate Guide to Long-Lasting Work Footwear
- Which organizations develop safety standards for work boots? Ensure Compliance & Worker Safety
- What materials are commonly used for outsoles in safety boots? A Guide to Durability, Grip, and Comfort
- Why is ankle and arch support important in safety footwear? Prevent Injury & Fatigue
- What are the key features of safety boots? Essential Protection for Hazardous Workplaces