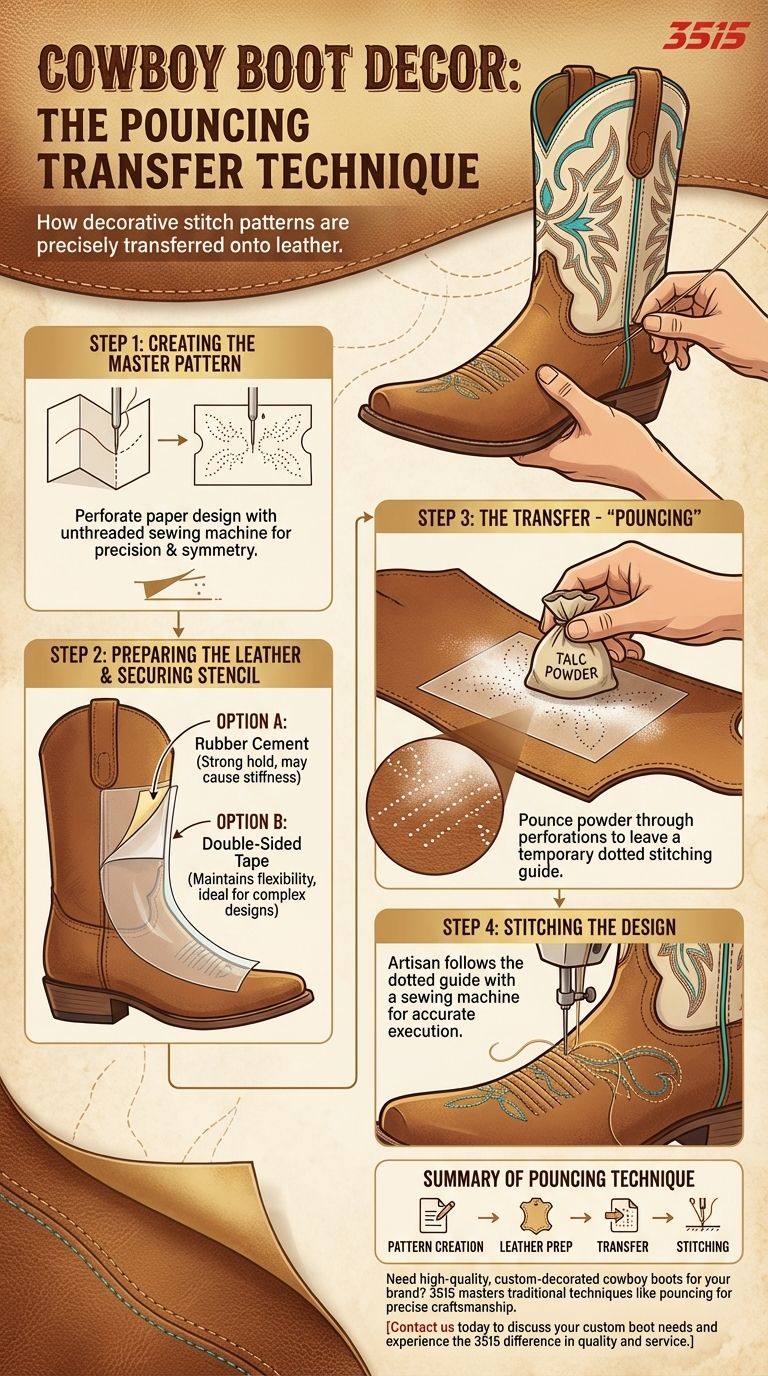
The fundamental technique for transferring decorative stitch patterns onto cowboy boots is a traditional artisan method known as "pouncing." This process uses a perforated paper stencil and a marking powder to create a precise dot-pattern guide directly on the leather. This allows the bootmaker to follow the intricate design with a sewing machine, ensuring accuracy and symmetry.
The core principle is simple: A paper pattern, perforated with the design's outline, acts as a stencil. An adhesive temporarily holds it to the leather, and a powder is "pounced" over it, leaving a dotted stitching guide that is both precise and non-permanent.
The Foundation: Creating the Master Pattern
The accuracy of the final stitched design depends entirely on the quality of the initial paper pattern. This is the blueprint for the entire decorative element.
From Sketch to Stencil
First, the design is finalized on paper. For perfectly symmetrical patterns, bootmakers often employ a simple yet effective technique: they fold the paper in half and draw only one side of the design.
The Role of the Unthreaded Needle
To turn the paper drawing into a stencil, the lines are perforated. This is typically done with a sewing machine that has no thread in the needle. This method creates a series of small, perfectly spaced holes that are far more consistent than what could be achieved by hand.
Achieving Perfect Symmetry
Once one half of a folded pattern is perforated, the paper is unfolded. The result is a complete, perfectly symmetrical stencil ready for transfer.
The Transfer Process: From Paper to Leather
With the stencil prepared, the next stage is transferring the pattern onto the boot's leather upper, which has already been cut to shape.
Preparing the Leather Surface
An adhesive is applied to the leather to hold the paper pattern securely in place during the transfer. This is a critical step to prevent the stencil from shifting, which would ruin the design.
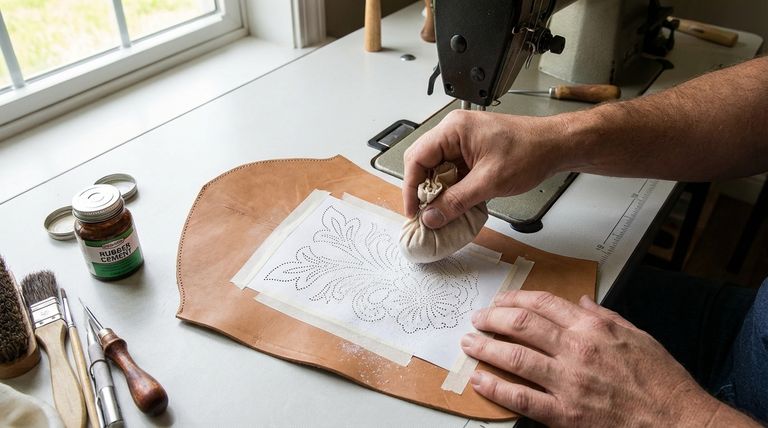
The "Pounce": Applying the Powder
With the pattern positioned correctly, the bootmaker takes a small pouch of talc or a similar powder and gently dabs or "pounces" it over the surface of the paper.
The Result: A Clear Stitching Guide
The fine powder passes through the perforations in the paper, leaving behind a clear series of dots on the leather surface. When the paper pattern is removed, this dotted line serves as an exact guide for the artisan to follow with the sewing machine needle.
Understanding the Trade-offs: Adhesives Matter
The choice of adhesive for temporarily holding the pattern is a small detail with significant implications for the final product's feel and quality.
The Traditional Method: Rubber Cement
Rubber cement is a common choice. It provides a strong hold, ensuring the pattern does not move. However, it can sometimes leave the leather feeling slightly stiff after it's removed, which can be a drawback.
The Modern Alternative: Double-Sided Tape
To avoid the stiffness associated with cement, some bootmakers prefer double-sided tape. This is especially useful when transferring multiple, overlapping design elements onto the same piece of leather, as it helps maintain the material's natural flexibility.
The Artisan's Choice: Method Follows Function
The bootmaker's selection of materials is always driven by the specific demands of the design.
- If the primary focus is a simple, robust design: Traditional rubber cement provides a reliable hold that is perfectly suitable.
- If the primary focus is a complex, multi-layered pattern: Double-sided tape is often the superior choice to preserve the leather's softness and flexibility.
Ultimately, this precise and methodical transfer process is a testament to the skill and attention to detail that defines true bootmaking craftsmanship.
Summary Table:
| Step | Key Action | Purpose |
|---|---|---|
| 1. Pattern Creation | Perforate a paper design with an unthreaded sewing machine. | Creates a reusable, symmetrical stencil. |
| 2. Leather Preparation | Apply a temporary adhesive (cement or tape) to the leather. | Secures the stencil in place to prevent shifting. |
| 3. Pattern Transfer | Pounce talc powder over the perforated stencil. | Leaves a dotted guide on the leather for stitching. |
| 4. Stitching | Follow the dotted guide with the sewing machine. | Executes the intricate decorative design accurately. |
Need high-quality, custom-decorated cowboy boots for your brand or retail business?
As a large-scale manufacturer, 3515 produces a comprehensive range of footwear for distributors, brand owners, and bulk clients. Our production capabilities encompass all types of boots, and we master traditional techniques like pouncing to ensure your designs are executed with precision and craftsmanship.
Contact us today to discuss your custom boot needs and experience the 3515 difference in quality and service.
Visual Guide
Related Products
- Wholesale High-Traction Camo Boots - Custom Manufacturer for Brands
- Durable Leather Tactical Boots Wholesale & Custom Manufacturing for Brands
- High-Traction Suede Tactical Boots Wholesale & Custom Manufacturing
- Wholesale Lightweight Tactical Boots Custom Manufacturer for Desert & Combat Use
- Wholesale Waterproof Tactical Boots Custom Suede & High-Traction Soles
People Also Ask
- What are the key features of the new line of camo boots? Built for Extreme Cold & Rugged Terrain
- Why is traction an essential feature in work boots? Prevent Slips and Ensure Workplace Safety
- How does the Rank Score Test identify the primary causes of premature failure in tactical and work boots? Key Insights
- What shoes to wear for a security job? Durable, Protective Footwear for Long Shifts
- What is the technical logic behind using closed-eye testing for tactical boots? Unlocking Peak Footwear Stability