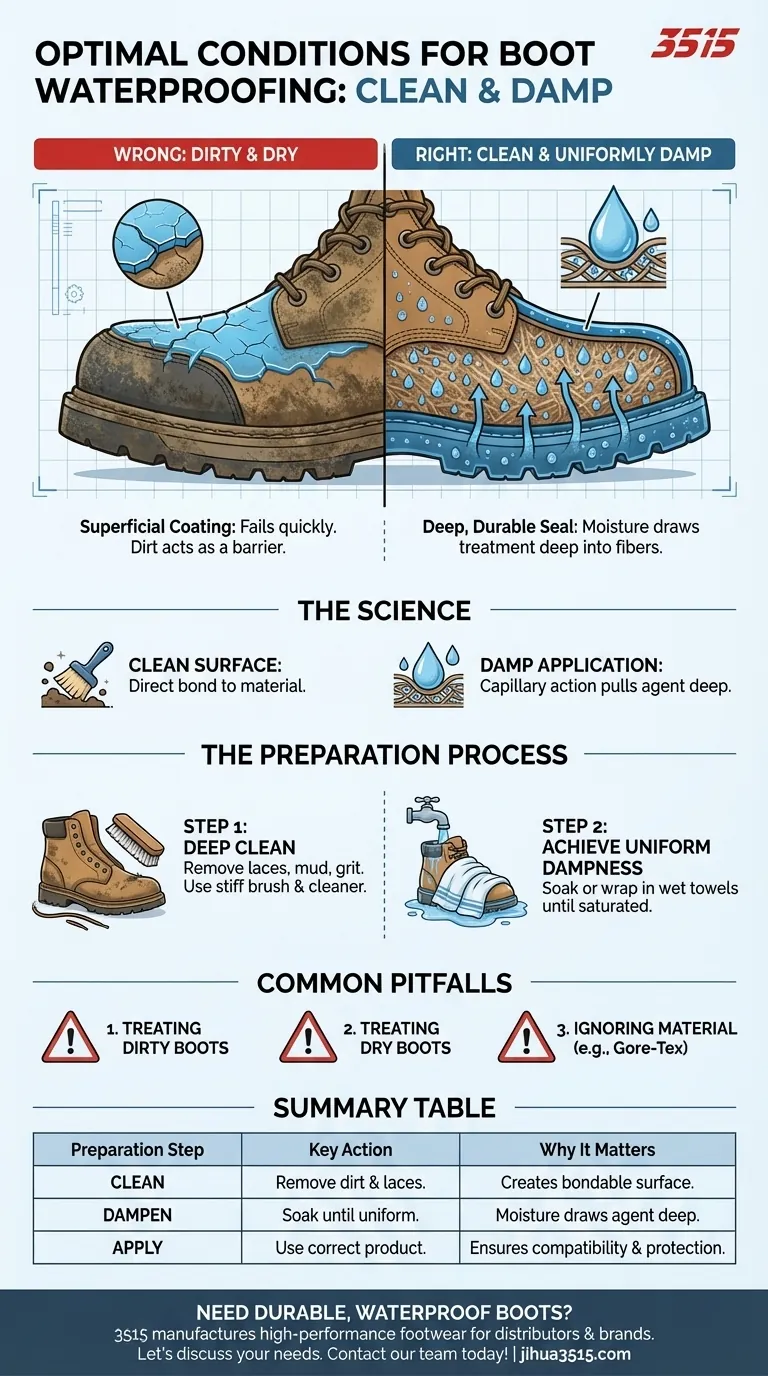
To get the best results, you should apply waterproofing treatments to boots that are thoroughly clean and uniformly damp. While applying a water-based treatment to a wet surface may seem counterintuitive, this condition is critical for the product to properly penetrate the material, ensuring a deep and durable seal rather than a superficial coating.
The core principle is simple: A clean surface allows the treatment to bond directly with the boot's material, while existing moisture within the material acts as a carrier, drawing the waterproofing agent deep into the fibers for maximum effectiveness and longevity.
Why Clean and Damp is the Gold Standard
Understanding the logic behind this preparation method ensures you won't waste time or product on an application that is destined to fail. The two conditions—clean and damp—serve distinct but equally important purposes.
The Critical Role of a Clean Surface
Dirt, dust, and grime create a physical barrier between the waterproofing treatment and the boot's exterior.
Applying a product over this layer of debris prevents it from bonding with the leather or fabric. This leads to patchy, uneven coverage and a seal that will quickly fail. A clean boot is a blank canvas.
The Science of a Damp Application
Waterproofing treatments are designed to be drawn deep into the boot's material through capillary action.
When the leather or fabric is already damp, the water present in its fibers helps pull the waterproofing agent in. Applying treatment to a completely dry boot often results in a shallow, surface-level coating that sits on top of the material and wears away quickly with use.
The Correct Preparation Process
Proper preparation is straightforward and is the single most important factor for a successful treatment. Rushing this stage will compromise the entire process.
Step 1: Perform a Deep Clean
First, remove the laces to ensure you can access the entire boot, including the tongue and eyelets.
Next, use a stiff brush to remove all caked-on mud, dust, and embedded grit. For stubborn grime, you may need to use a specialized boot cleaner and a small amount of water.
Step 2: Achieve Uniform Dampness
Once the boots are clean, you need to make them damp. You can do this by running them under a tap until the exterior is thoroughly soaked.
If your boots have dried out after cleaning, a highly effective method is to wrap them in very wet towels or rags for a couple of hours. This ensures the material is saturated evenly, which is the ideal state for application.
Common Pitfalls to Avoid
Even with the right intentions, a few common mistakes can undermine your waterproofing efforts. Being aware of them can save you significant frustration.
Mistake #1: Treating Dirty Boots
This is the most frequent error. It guarantees a weak, inconsistent waterproof seal and is essentially a waste of product. Always start with a perfectly clean surface.
Mistake #2: Treating Dry Boots
The second most common mistake is applying the treatment to bone-dry boots. This results in a weak, superficial layer that offers minimal protection and durability.
Mistake #3: Ignoring the Boot's Material
Always check the treatment's instructions. Some products are specific to full-grain leather, suede, or synthetic fabrics. Furthermore, if your boots have a waterproof/breathable membrane like Gore-Tex, you do not need to treat the fabric panels, only the leather or suede components.
A Simple Checklist for Perfect Application
Use these guidelines to match your preparation to your goal.
- If your primary focus is maximum effectiveness: Always apply waterproofing treatments to thoroughly cleaned and uniformly damp boots, never dry or dirty.
- If your boots are brand new: Do not assume they are ready. Clean off any factory residue and ensure they are damp before applying the first protective treatment.
- If your boots have a waterproof membrane: Concentrate the treatment only on the leather or suede sections and simply clean the fabric panels.
Properly preparing your boots ensures your waterproofing treatment performs exactly as intended, protecting your gear for the trail ahead.
Summary Table:
| Preparation Step | Key Action | Why It Matters |
|---|---|---|
| Clean | Remove all dirt, grime, and laces. | Creates a clean surface for the treatment to bond directly to the material. |
| Dampen | Soak boots or wrap in wet towels until uniformly damp. | Moisture draws the waterproofing agent deep into the fibers via capillary action. |
| Apply | Use the correct product for your boot's material. | Ensures compatibility and effective, long-lasting protection. |
Need Durable, Waterproof Boots for Your Customers?
As a large-scale manufacturer, 3515 produces a comprehensive range of high-performance footwear for distributors, brand owners, and bulk clients. Our production capabilities encompass all types of waterproof shoes and boots, built to the highest standards for ultimate protection and longevity.
Let's discuss your specific needs and how we can deliver the reliable, high-quality footwear your market demands.
Contact our team today to explore partnership opportunities!
Visual Guide
Related Products
- High-Traction Suede Tactical Boots Wholesale & Custom Manufacturing
- Durable Leather Work Boots Wholesale Manufacturer & Custom Factory
- Durable Leather Work Boots for Wholesale & Custom OEM Manufacturing
- Durable Leather Work Boots for Wholesale & Custom Manufacturing
- Durable Leather Tactical Boots Wholesale & Custom Manufacturing for Brands
People Also Ask
- What specialized protections do tactical boots offer? Maximize Endurance with High-Performance Footwear
- Why is sequential analysis utilized to evaluate tactical boots? Master Dynamic Boot Development and Ergonomic Performance
- What are the primary differences between tactical boots and combat boots? Choose the Right Boot for Your Mission
- How do tactical boots differ from regular boots? Performance, Durability & Design Explained
- How do military uniforms and tactical boots impact the prediction of thermal risk? Essential Safety Insights