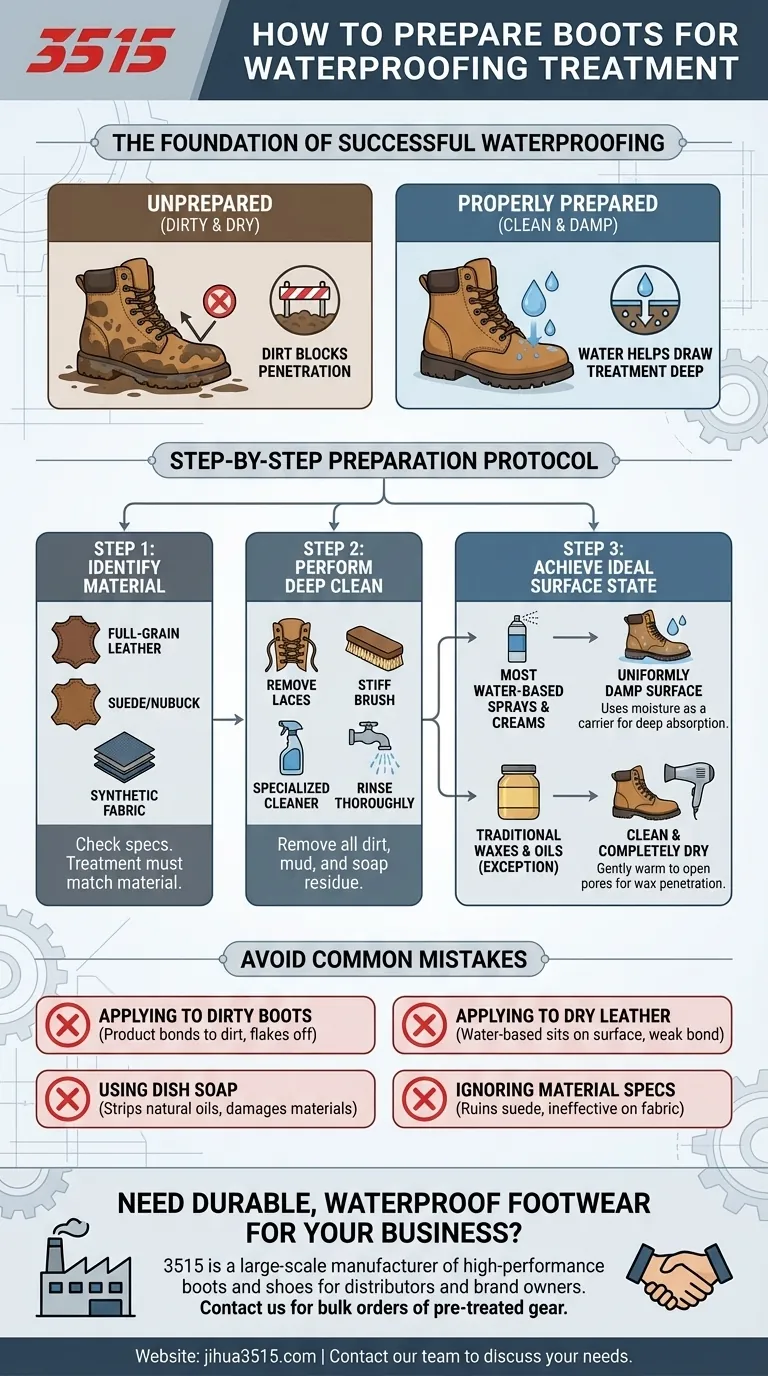
To properly prepare your boots for waterproofing, you must first clean them thoroughly and then ensure the material is in the correct state—usually uniformly damp—to draw the treatment deep into its fibers. This preparation is not an optional step; it is the primary factor that determines whether the treatment will succeed or fail.
The effectiveness of any waterproofing treatment hinges on preparation. A clean, properly conditioned surface allows the product to penetrate and bond with the boot's material, creating a durable barrier rather than a weak, temporary coating that quickly wears away.
The Foundation: Why Preparation is Non-Negotiable
Applying a waterproofing treatment to an unprepared boot is like painting over a dirty, dusty wall. The product may stick initially, but it won't form a lasting, protective bond.
Removing Barriers to Penetration
Dirt, mud, and fine grit become physically embedded in the pores of leather and fabric. If not removed, this grime acts as a barrier, preventing the waterproofing agent from reaching and saturating the boot's material.
This leads to a patchy, incomplete application that will fail in the exact spots that are clogged with residual dirt.
Using Water as a Carrier
For most modern, water-based waterproofing treatments, the principle is simple: water helps draw the treatment in. Applying these products to clean but still-damp boots uses the existing moisture within the exterior material as a conduit.
This process pulls the waterproofing polymers deep into the leather or fabric, ensuring comprehensive coverage from the inside out.
A Step-by-Step Preparation Protocol
Follow these sequential steps to create the ideal foundation for any waterproofing application. The time you invest here directly translates to the performance and longevity of the treatment.
Step 1: Identify Your Boot Material
Before you clean or treat, you must know what you're working with. A treatment designed for full-grain leather can ruin suede, and a heavy wax won't work on synthetic fabric.
Check the manufacturer's specifications for your boots. Common materials include full-grain leather, nubuck, suede, and synthetic fabrics, often used in combination.
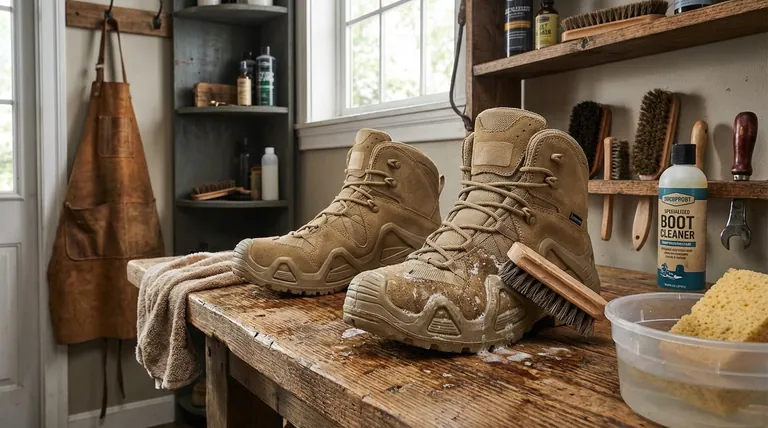
Step 2: Perform a Deep Clean
Start by removing the laces to ensure you can access the entire boot, including the tongue and eyelets.
Use a stiff-bristled brush to knock off all caked-on mud and loose debris. For stubborn dirt, use a small amount of specialized boot cleaner and water, scrubbing gently until the surface is completely clean.
Rinse the boots thoroughly with cool water to remove all soap and dirt residue.
Step 3: Achieve the Ideal Surface State
This is the most critical preparation step. For the vast majority of water-based sprays and creams, you need a clean, damp surface.
After rinsing, your boots should be in the perfect state. If they have dried out, you can wrap them in a wet towel for an hour or two to re-dampen the exterior without soaking the interior.
The goal is a uniformly damp exterior, not a boot that is dripping wet.
Understanding the Pitfalls: Common Preparation Mistakes
Avoiding these common errors is just as important as following the correct procedure. A single misstep here can compromise the entire waterproofing process.
Mistake: Applying to Dirty Boots
This is the most frequent cause of treatment failure. The waterproofing product bonds to the dirt, not the boot, and flakes away as soon as the dirt dislodges.
Mistake: Applying to Dry Leather (with water-based products)
When you apply a water-based treatment to completely dry leather, it tends to sit on the surface. It cannot penetrate deeply, resulting in a superficial coating that offers minimal protection and wears off quickly.
Exception: Traditional Waxes and Oils
A key exception to the "damp" rule is for traditional, heavy-duty wax or oil-based sealants. These products require a clean and completely dry surface. Gently warming the dry leather with a hairdryer can open its pores, helping the wax melt and penetrate more effectively.
Mistake: Using the Wrong Cleaner
Never use dish soap or harsh detergents to clean your boots. These agents can strip the natural oils from leather and damage the factory-applied treatments on synthetic materials, causing them to become dry and brittle.
Matching Your Prep to Your Goal
Your preparation method must align with your specific boots and the waterproofing product you have chosen.
- If you are using a modern water-based treatment (most sprays/creams): Focus on cleaning the boots thoroughly and applying the product while the exterior is still uniformly damp.
- If you are using a traditional wax or oil-based sealant: Ensure the boots are meticulously clean and completely dry, then gently warm the leather to aid absorption.
- If you have combination fabric and leather boots: Choose a product safe for all materials and follow the standard "clean and damp" method for the most reliable results.
Proper preparation transforms waterproofing from a temporary chore into a durable, integrated shield for your footwear.
Summary Table:
| Preparation Step | Key Action | Why It Matters |
|---|---|---|
| Identify Material | Check boot specs (leather, suede, fabric) | Ensures compatibility with the correct waterproofing product |
| Deep Clean | Remove laces, brush off dirt, rinse thoroughly | Eliminates barriers that prevent product penetration |
| Surface State | Achieve uniformly damp (for water-based products) or dry (for wax/oil) | Uses moisture as a carrier for deep absorption or allows wax to penetrate dry pores |
| Avoid Common Mistakes | Don't use harsh detergents or apply to dirty/dry boots | Prevents damage to materials and ensures treatment longevity |
Need Durable, Waterproof Footwear for Your Business?
As a large-scale manufacturer, 3515 produces a comprehensive range of high-performance boots and shoes for distributors, brand owners, and bulk clients. Our production capabilities encompass all types of footwear, including those pre-treated for superior waterproofing and durability.
Let us help you equip your customers with reliable gear that stands up to the elements. Contact our team today to discuss your specific needs and explore our extensive catalog.
Visual Guide
Related Products
- Wholesale Durable Safety Boots | Custom Steel Toe & Puncture-Resistant Manufacturing
- Premium Wholesale Tactical Style Safety Shoes Boots with Quick Lacing
- Premium Wholesale Waterproof Safety Boots High Performance Protection for Industrial Markets
- Durable Leather Work Boots for Wholesale & Custom Manufacturing
- Durable Goodyear Welt Leather Work Boots for Wholesale & Private Label
People Also Ask
- What are the common hazards present in work environments that safety boots protect against? Find Your Perfect Match
- Why is a high-precision 3D motion capture system necessary for measuring joint range of motion? Optimize Safety & Mobility
- What are the key features of safety boots? Essential Protection for Hazardous Workplaces
- What primary protective functions do professional safety boots provide in urban solid waste recovery and waste picking processes? Discover Dual-Layer Protection.
- What are the risks of using ordinary rubber boots in forest clearing? Why professional safety boots are essential