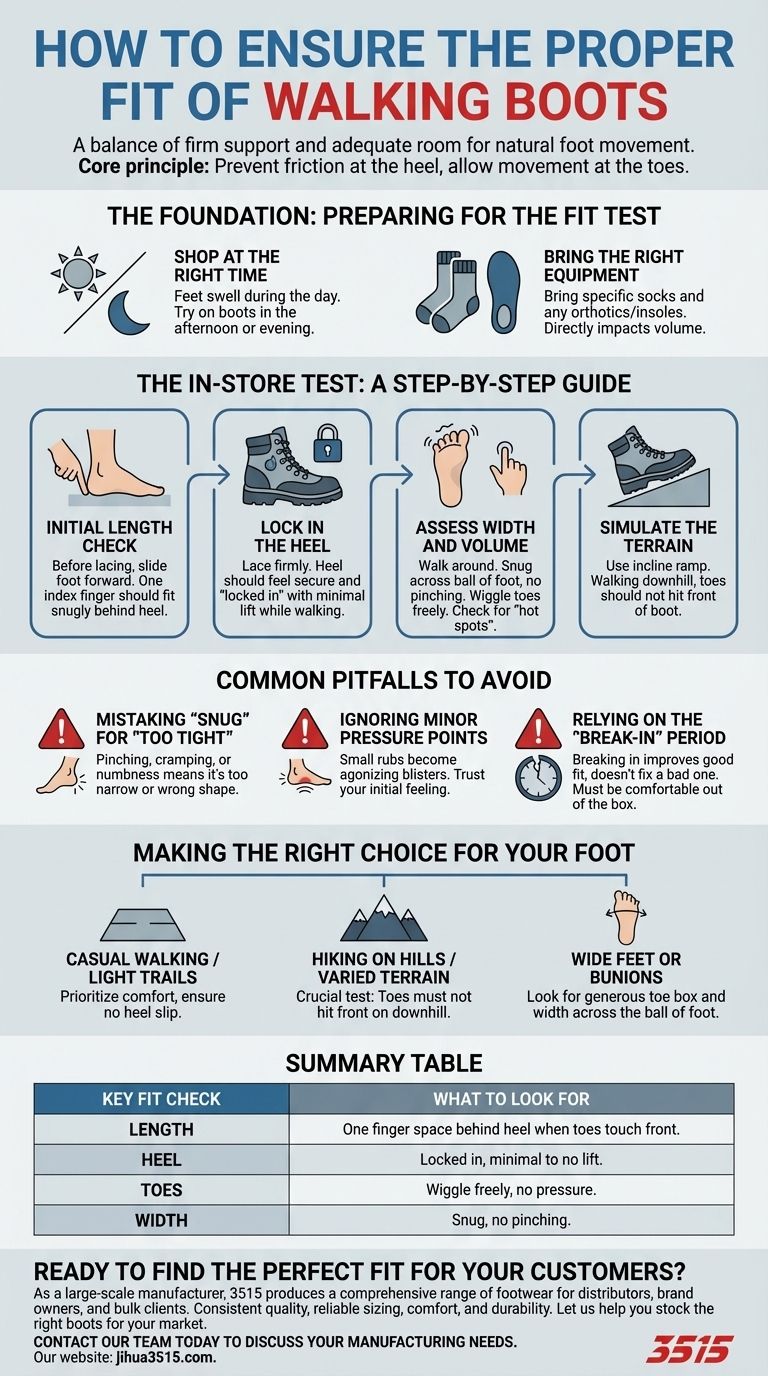
To ensure a proper fit for walking boots, you must assess more than just the size. The process involves testing for length, securing your heel, and checking for pressure points across the entire foot, ideally while wearing the type of socks you'll use on your walk. A correct fit is a balance between firm support and adequate room for natural foot movement.
The core principle of a proper boot fit is preventing movement where it causes friction (the heel) while allowing for it where it's necessary (the toes). This fundamental balance is the key to avoiding blisters and ensuring comfort on any terrain.

The Foundation: Preparing for the Fit Test
Before you even put on a boot, a few simple steps can dramatically improve your chances of finding the right fit.
Shop at the Right Time
Your feet naturally swell throughout the day. Always try on boots in the afternoon or evening to ensure you are fitting them to your foot at its largest size.
Bring the Right Equipment
The thickness of your sock directly impacts the volume inside the boot. Always bring the specific socks you plan to walk or hike in. If you use custom orthotics or specialized insoles, bring those as well.
The In-Store Test: A Step-by-Step Guide
Once you are in the store, follow a systematic process. Don't rush it; a few extra minutes here can save you hours of discomfort later.
Step 1: The Initial Length Check
Before lacing the boot, slide your foot forward until your toes touch the front. You should be able to slide one index finger snugly between your heel and the back of the boot. Too much space means the boot is too long; too little means your toes will slam into the front on descents.
Step 2: Lock In the Heel
Lace up the boot firmly, but not so tightly that you cut off circulation. Your heel should feel secure and "locked in" to the back of the boot. As you walk, you should experience minimal to no heel lift. A slipping heel is the primary cause of blisters.
Step 3: Assess Width and Volume
Stand up and walk around. The boot should feel snug across the ball of your foot without pinching. You should have enough room to wiggle your toes freely. Pay close attention to any "hot spots"—areas of focused pressure or rubbing.
Step 4: Simulate the Terrain
If the store has an incline ramp, use it. Walking downhill is the ultimate test. If your toes slide forward and hit the front of the boot, the fit is incorrect. The lacing and heel cup should hold your foot in place.
Common Pitfalls to Avoid
Achieving the perfect fit often means sidestepping common mistakes.
Mistaking "Snug" for "Too Tight"
A walking boot should cradle your foot securely, but it shouldn't be restrictive. Any feeling of pinching, cramping, or numbness is a clear sign the boot is too narrow or the wrong shape for your foot.
Ignoring Minor Pressure Points
It is easy to dismiss a small rubbing sensation in the store. However, a minor annoyance after five minutes of walking can become an agonizing blister after five miles. Trust your initial feeling; if it doesn't feel right, it isn't the right boot for you.
Relying on the "Break-In" Period
While most boots benefit from a short break-in period to soften and conform to your foot, this process cannot fix a fundamentally bad fit. The boot should be comfortable out of the box. Breaking in improves a good fit; it does not create one.
Making the Right Choice for Your Foot
Your final decision should be guided by your foot shape and intended use.
- If your primary focus is casual walking or light trails: Prioritize overall comfort and ensure your heel does not slip during a normal walking motion.
- If your primary focus is hiking on hills or varied terrain: The most critical test is ensuring your toes do not hit the front of the boot when walking downhill.
- If you have wide feet or bunions: Pay special attention to the width across the ball of your foot and look for brands known for a generous toe box.
Ultimately, the right walking boot is the one you forget you're wearing.
Summary Table:
| Key Fit Check | What to Look For |
|---|---|
| Length | One finger's width of space behind the heel when toes touch the front. |
| Heel | Heel is locked in with minimal to no lift when walking. |
| Toes | Enough room to wiggle toes freely without pressure. |
| Width | Snug fit across the ball of the foot without pinching. |
Ready to find the perfect fit for your customers?
As a large-scale manufacturer, 3515 produces a comprehensive range of footwear for distributors, brand owners, and bulk clients. Our production capabilities encompass all types of shoes and boots, ensuring consistent quality, reliable sizing, and designs built for comfort and durability. Let us help you stock the right boots for your market.
Contact our team today to discuss your manufacturing needs.
Visual Guide
Related Products
- Heavy-Duty Waterproof Nubuck Safety Boots Safety Shoes for Bulk Supply
- Durable Goodyear Welt Leather Work Boots for Wholesale & Private Label
- Durable Rubber Sole Outdoor Shoes Wholesale & Custom Manufacturing
- Wholesale Safety Boots Manufacturer for Custom & Private Label Orders
- Wholesale High-Traction Camo Boots - Custom Manufacturer for Brands
People Also Ask
- What materials are commonly used for outsoles in safety boots? A Guide to Durability, Grip, and Comfort
- What are the slip resistance requirements for safety boots? Professional Grip Standards for Poultry Facility Cleaning
- Why is a high-precision 3D motion capture system necessary for measuring joint range of motion? Optimize Safety & Mobility
- Which organizations develop safety standards for work boots? Ensure Compliance & Worker Safety
- What are the consequences of not wearing safety boots? Protect Your Finances and Career