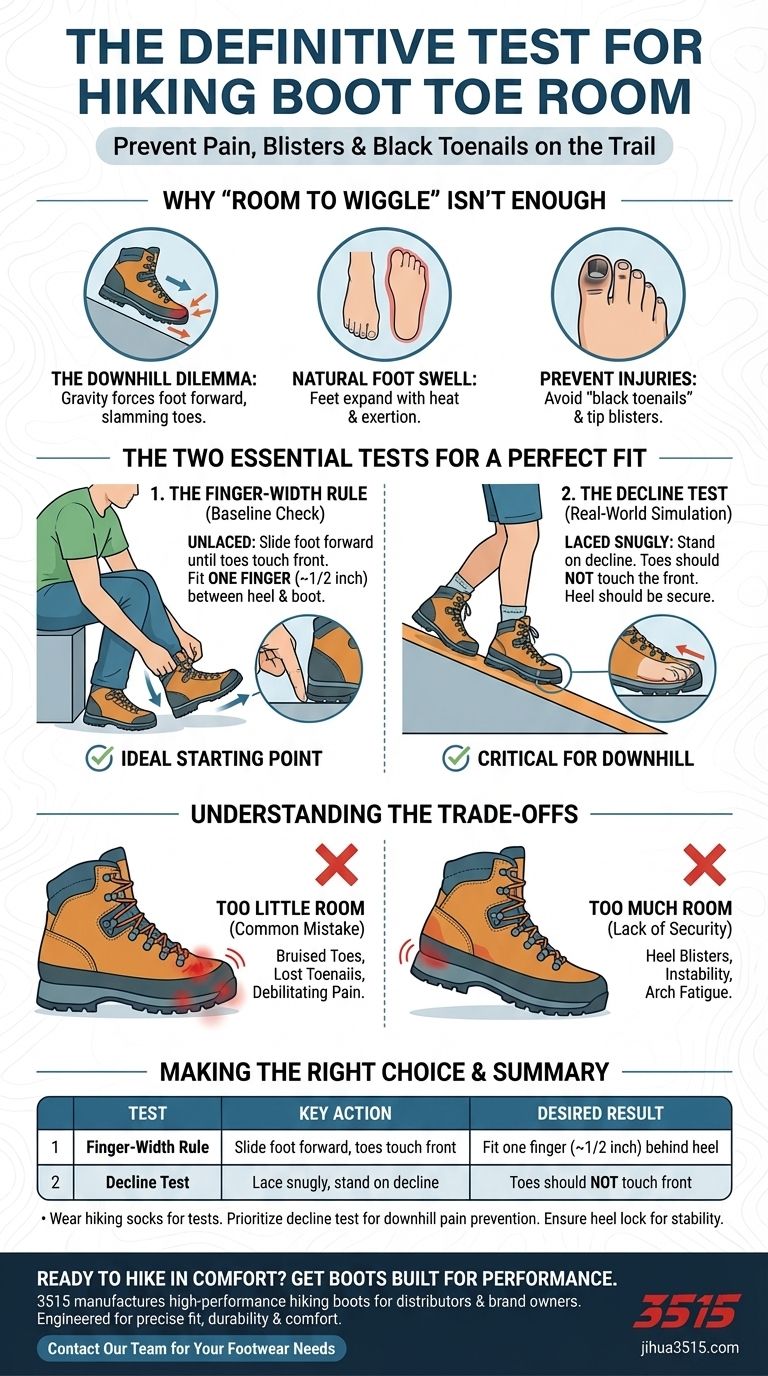
The definitive test for toe room in a hiking boot involves two key steps. First, with the boot unlaced, slide your foot forward until your toes touch the front; you should be able to fit one finger (about a half-inch) between your heel and the back of the boot. Second, lace the boot snugly and stand on a decline, like a ramp or stair; your toes should not touch the front of the boot at all.
The goal of checking toe room is not just about comfort, but about preventing your foot from sliding forward and smashing your toes into the front of the boot during downhill sections of a trail—the single biggest cause of foot pain and blackened toenails.
Why "Room to Wiggle" Isn't Enough for Hiking
A casual shoe fit is forgiving, but the unique stresses of hiking demand a more precise approach. The space in front of your toes is a critical safety feature, not a luxury.
The Downhill Dilemma
When you hike downhill, gravity and momentum work together to push your entire foot forward inside your boot.
Without sufficient length, each step forces your toes to slam into the unyielding toe box. This repeated impact is the primary cause of intense pain and bruising.
Natural Foot Swell
Over the course of a long hike, your feet will naturally swell from heat, exertion, and increased blood flow.
That extra space you confirmed in the store ensures the boot can accommodate this swelling without becoming painfully tight and restrictive miles into your journey.
Preventing Blisters and Black Toenails
Constant pressure and impact on your toenails can cause blood to pool underneath them, a painful condition known as a subungual hematoma, or "black toenail."
This pressure, combined with the friction of your toes hitting the boot, is also a major cause of blisters on the tips of your toes.
The Two Essential Tests for a Perfect Fit
These two tests work together. The first checks for sufficient boot length, while the second confirms that your foot can be secured properly to prevent it from sliding into that space.
The Finger-Width Rule (The Baseline Check)
Before lacing up, sit down and slide your foot forward in the boot until your toes make gentle contact with the front.
From this position, you should be able to comfortably slide your index finger between your heel and the back of the boot. This generally corresponds to about a half-inch of space, which is the ideal starting point.
The Decline Test (The Real-World Simulation)
This is the most critical test. Lace the boots up snugly—not tight enough to cut off circulation, but secure enough to lock your heel in place.
Find a small ramp or use the edge of a stair. Stand with your weight on the tested foot, angled downhill. Your foot should feel secure, and your toes should not touch the front of the boot. If they do, the boot is either too small or the wrong shape to hold your heel properly.
Understanding the Trade-offs
Achieving the right amount of toe room is a balancing act. Both too little and too much space can cause significant problems on the trail.
The Danger of Too Little Room
This is the most common and painful mistake. A boot that feels perfectly "snug" in the store will become an instrument of torture on a long descent.
The consequences are predictable: bruised toes, lost toenails, and debilitating pain that can cut a hike short. There is no benefit to having insufficient room.
The Problem with Too Much Room
If a boot is excessively long, your foot will slide back and forth with every step. This lack of security can cause painful heel blisters from friction and chafing.
Furthermore, too much length means the built-in arch support and the flex point of the boot will not align with your foot's anatomy, leading to instability and arch fatigue.
Making the Right Choice for Your Feet
Use these principles to ensure your boots are an asset, not a liability.
- If your primary focus is preventing downhill toe pain: Prioritize the decline test above all else; your toes must not slide forward and touch the front.
- If your primary focus is overall stability: After confirming toe room, ensure your heel is locked securely in the boot's heel cup with minimal lift as you walk.
- If you are trying on boots in a store: Always perform these tests while wearing the exact type of socks you plan to hike in, as sock thickness dramatically affects fit.
A proper fit is the foundation of every successful and enjoyable hike.
Summary Table:
| Test | Purpose | Key Action | Desired Result |
|---|---|---|---|
| Finger-Width Rule | Check boot length | Slide foot forward, toes touch front | Fit one finger (~1/2 inch) between heel and boot |
| Decline Test | Simulate downhill hiking | Lace snugly, stand on a decline | Toes should NOT touch the front of the boot |
Ready to Hike in Comfort? Get Boots Built for Performance.
As a large-scale manufacturer, 3515 produces a comprehensive range of high-performance hiking boots for distributors, brand owners, and bulk clients. Our boots are engineered with precise fit, durability, and trail-tested comfort in mind.
Let us help you equip your customers with the perfect fit. Contact our team today to discuss your footwear needs and explore our extensive production capabilities.
Visual Guide
Related Products
- Wholesale High-Traction Camo Boots - Custom Manufacturer for Brands
- Durable Rubber Sole Outdoor Shoes Wholesale & Custom Manufacturing
- Durable Spiked Camouflage Boots Wholesale & Factory Production
- Wholesale Lightweight Tactical Boots Custom Manufacturer for Desert & Combat Use
- Wholesale Waterproof Tactical Boots Custom Suede & High-Traction Soles
People Also Ask
- What should be considered when using the lace length chart for hiking and work boots? A Safety Guide
- How does the Rank Score Test identify the primary causes of premature failure in tactical and work boots? Key Insights
- What makes wide CAM boots different from standard CAM boots? A Guide to Choosing the Right Fit for Healing
- What are the key features of the new line of camo boots? Built for Extreme Cold & Rugged Terrain
- What are the advantages of custom-made work boots? Unlock Perfect Fit & Superior Durability