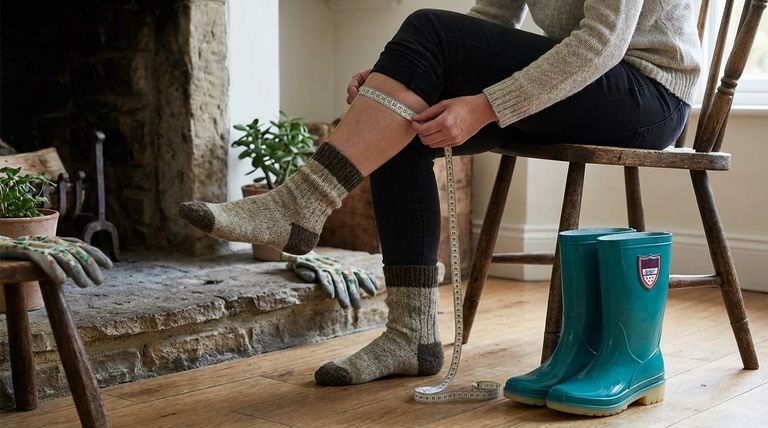
To measure your calf for wellington boots, you must first sit down wearing the trousers and socks you would typically use with them. Then, wrap a flexible tape measure around the widest part of your calf, ensuring you can slip one or two fingers between the tape and your leg to account for comfort and movement. This final number is your ideal calf measurement.
The goal of measuring is not just to find a number, but to simulate the real-world conditions of wearing the boots. An accurate measurement taken correctly prevents the common frustrations of a fit that is too tight to wear or too loose to walk in.
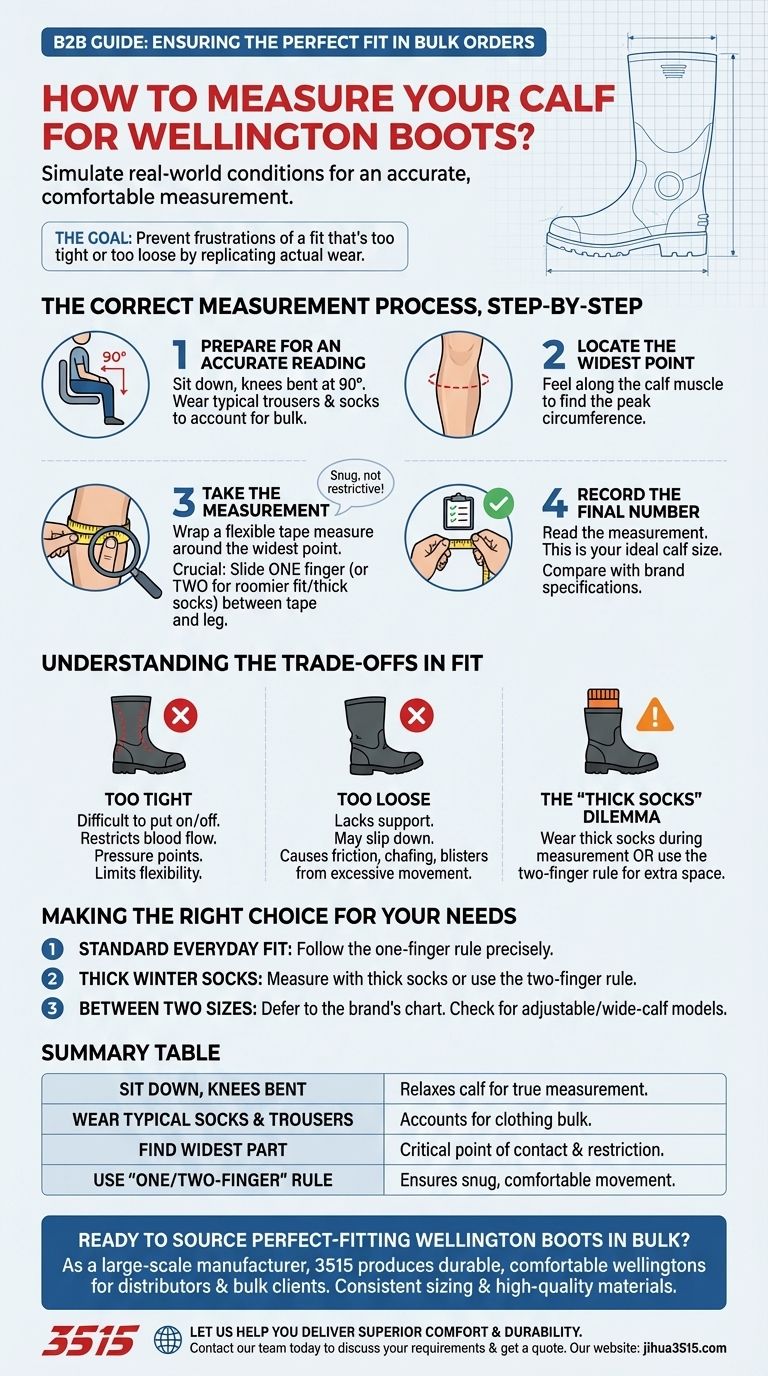
The Correct Measurement Process, Step-by-Step
A precise measurement is the foundation of a comfortable fit. Each step is designed to replicate how the boot will feel and function when you are actually using it.
Step 1: Prepare for an Accurate Reading
Before you measure, put on the socks and trousers (or leggings) you plan to wear most often with your wellies. This ensures you account for the bulk of the fabric.
Sit in a chair with your feet flat on the floor and your knees bent at a 90-degree angle. This relaxes the calf muscle, providing a consistent and accurate baseline measurement.
Step 2: Locate the Widest Point
The widest part of your calf is the most critical point of contact and potential restriction for a tall boot. Feel along your calf muscle to identify this peak circumference; it is typically about halfway between your knee and your ankle.
Step 3: Take the Measurement
Wrap a flexible tape measure around this widest point. Keep the tape level and snug against your leg, but not tight enough to indent the skin.
This is the most crucial step: slide one finger between the tape and your leg. The tape should feel secure but not restrictive. For a roomier fit or for use with very thick socks, use two fingers.
Step 4: Record the Final Number
Read the measurement on the tape measure. This number is your ideal calf size, which you can now compare directly against the specifications provided in a brand's sizing chart.
Understanding the Trade-offs in Fit
Choosing the right calf size involves balancing a secure fit with all-day comfort. A small error in measurement can lead to significant issues.
The Problem with a Fit That's Too Tight
A boot that is too narrow in the calf can be difficult to put on and take off. More importantly, it can restrict blood flow, cause uncomfortable pressure points during the day, and limit the flexibility needed for walking on uneven ground.
The Problem with a Fit That's Too Loose
Conversely, a boot that is too wide will lack support and may slip down as you walk. This can lead to friction, chafing, and blisters, as your leg moves around excessively inside the boot shaft.
The "Thick Socks" Dilemma
If you plan to wear exceptionally thick winter socks, it is best to wear them during the measurement process. Alternatively, use the "two-finger" rule to add a bit more space, rather than simply sizing up, which could make the foot of the boot too large.
Making the Right Choice for Your Needs
Use your measurement to make an informed decision based on how you intend to use your boots.
- If your primary focus is a standard, everyday fit: Follow the one-finger rule precisely and match that measurement to the brand's size guide.
- If your primary focus is use with thick winter socks: Measure while wearing your thickest socks or consistently use the two-finger rule for a roomier fit.
- If you are consistently between two sizes: Always defer to the specific brand's size chart, as calf widths can vary significantly between manufacturers, and check if they offer adjustable or wide-calf models.
Taking a few moments to measure correctly is the single most effective way to ensure your new wellingtons are comfortable and functional from the very first wear.
Summary Table:
| Key Measurement Factor | Why It Matters |
|---|---|
| Sit Down with Knees Bent | Relaxes the calf muscle for a true, consistent measurement. |
| Wear Your Typical Socks & Trousers | Accounts for the bulk of clothing to simulate real-world wear. |
| Find the Widest Part of Your Calf | This is the critical point of contact and potential restriction. |
| Use the "One or Two-Finger" Rule | Ensures a snug but comfortable fit, allowing for movement. |
Ready to Source Perfect-Fitting Wellington Boots in Bulk?
As a large-scale manufacturer, 3515 produces a comprehensive range of durable and comfortable wellington boots for distributors, brand owners, and bulk clients. Our production capabilities ensure consistent sizing and high-quality materials, so you can confidently offer your customers a perfect fit every time.
Let us help you deliver superior comfort and durability.
Contact our team today to discuss your specific requirements and get a quote.
Visual Guide
Related Products
- Durable Waterproof Rain Boots | Custom Manufacturer for Wholesale & Brands
- Durable Goodyear Welt Leather Work Boots for Wholesale & Private Label
- Wholesale Durable Leather Work Boots | 8-Inch Goodyear Welt Manufacturer
- Premium Wholesale Tactical Style Safety Shoes Boots with Quick Lacing
- Durable Leather Tactical Boots Wholesale & Custom Manufacturing for Brands
People Also Ask
- What are the main materials for waterproof rain boots? Choose the Right Material for Durability & Comfort
- What are the care instructions for maintaining waterproof boots? Ensure Long-Lasting Dryness & Durability
- What is the overall recommendation for choosing rain boot materials? A Guide to Rubber vs. PVC
- What are the best types of shoes for different gardening conditions? Find Your Perfect Match.
- What factors should be considered when choosing rain boots? Find the Perfect Boot for Your Needs